When your printhead moves from one point to another during printing, the heat of the nozzle combined with built-up pressure in the hot end results in some excess filament being forced out. This event is a form of over-extrusion and often leaves faint strings along the printhead’s path between points.
While strings can be removed with tools and heat (e.g. hairdryer) after printing, they’re still a bit annoying to deal with and sometimes the removal process can affect the print itself.
Retraction is a feature meant to eliminate stringing by pulling back (retracting) filament when the printhead moves to a new location. Doing so counteracts the hot end pressure and helps prevent excess material from flowing when it’s not supposed to.
Retraction can be enabled and adjusted when preparing a model for printing in a slicer, like Cura or PrusaSlicer. With well-tuned settings, they can eliminate stringing, blobs, zits, and other extrusion-related print quality problems. Although the available retraction settings differ by slicer, many are the same or similar across programs.
In this article, we’ll go over the most important retraction settings and how to adjust them. Before we look at them, though, let’s check out some general things that are good to keep in mind before you download a test and start tweaking numbers on your slicer.
Even if you’re entirely new to fused deposition modeling (FDM) 3D printing, chances are you already know that there are different types of filament that can be printed.
Among the most common materials used, you likely know that PLA, PETG, and ABS differ, just like PLA and PLA+ aren’t identical, and TPU and TPE may both have some elasticity but they also have varying printing settings. You also might know that flexible materials are best avoided when using 3D printers that have a Bowden extrusion setup.
So, if you need to change retraction settings to improve print quality, then all of these factors will affect how the changes are made. Different materials print ideally at various speeds, and the extrusion setup will also affect its travel.
For example, flexible materials have a tougher time being retracted because when they’re pulled, they stretch rather than being drawn in. So it may ultimately be a waste of time to have retraction enabled for flexibles, not to mention the potential damage to the filament.
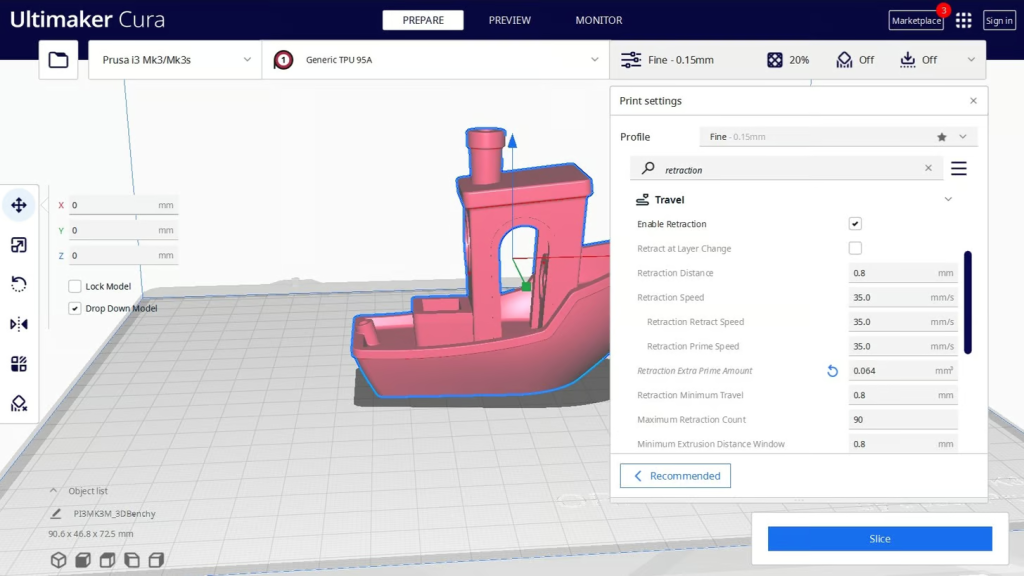
Now, let’s take a closer look at what retraction settings can be found in arguably the most famous slicer, Cura.
There are plenty of reasons behind Cura’s popularity, from its many plug-ins to its innumerable settings – settings that include a variety of retraction options. Because many other slicers are forks of Cura, you may find similar names for the same (or slightly different) settings.
Several settings can shape how retraction takes place. Let’s start by taking a closer look at distance, speed, and minimum travel, which are the ones you’ll be on the lookout for right off the bat. After that, we’ll get into some other minor retraction options.
Distance
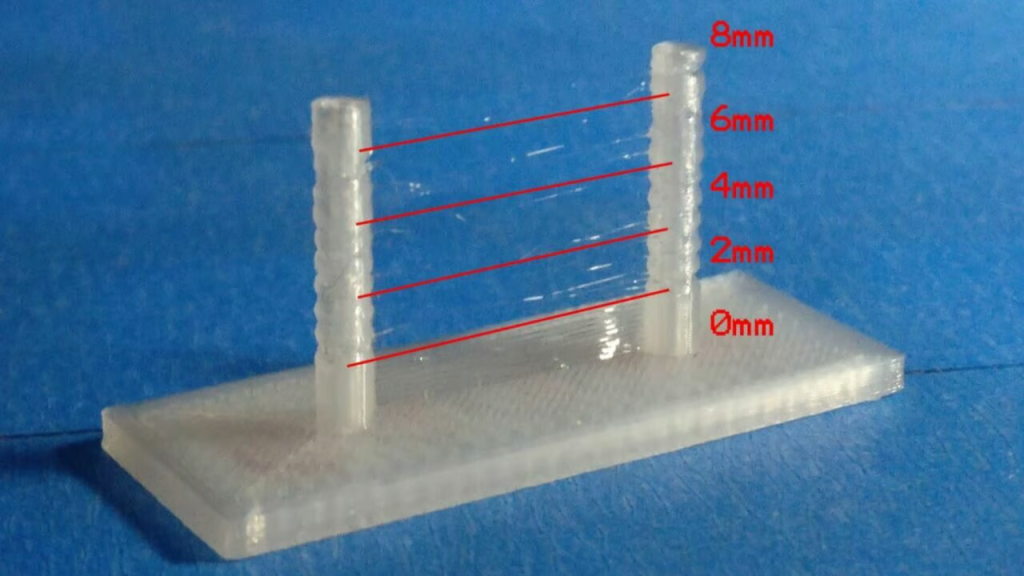
Retraction distance is the length of filament that’s pulled back by the extruder every time retraction occurs. The longer this distance is, the more time a retraction might take and the less likely you are to experience stringing.
Yet, if retraction were this simple, everyone would use a high retraction value, but this is not always a good idea. If you raise the value too much, the filament may retract too much and cause a hot end or nozzle clog.
A typical retraction distance ranges from 2 to 7 mm, but this value depends on your extruder configuration (direct or Bowden), hot end, and other factors; there’s no one perfect value. If you have a Bowden setup, a longer distance will be needed – it may reach 15 mm, but this will depend on how long the tube is. A direct extrusion setup won’t need such a lengthy retraction – a distance of around 0.5-2.0 mm, depending on the filament, should work.
If you want to adjust the retraction distance, you can start by tweaking the default in 0.5- or 1-mm increments until stringing is eliminated without any clogs or other problems, or you can give a more intensive approach a try.
Speed
Retraction speed is the other important retraction setting that determines how quickly retraction is carried out. This setting is very important because it can influence print time as well as how effective retraction is at eliminating stringing.
For example, halving your retraction speed while keeping the same retraction distance may only worsen your stringing issues. That’s because too slow of a speed won’t relieve the pressure fast enough to prevent excess material from exiting the nozzle. On the other side of the spectrum, too high of a speed could cause a number of problems, including filament breakage inside the hot end – and you may still experience stringing.
While some makers have shared higher speeds for Bowden extrusion setups and direct extrusion setup users have mentioned slightly lower speeds, the filament of choice will also affect the numbers that give you the best result.
Ideally, you want to use the fastest functional speed to reduce stringing and print time. For reference, your slicer’s default retraction speed will likely lie between 30 and 60 mm/s. If this value isn’t working for your printer, try lowering it to 10 or 15 mm/s and increasing the speed in 5-mm/s increments. Print the test model at each interval until the issue improves.
Minimum Travel

If two retraction movements occur close to each other, the filament is pulled back, extruded, pulled back, and extruded again, all in a short amount of time. This constant reversal of the filament motion increases the chance of a nozzle clog, and that’s where the minimal travel distance setting comes in.
Minimum travel distance controls how frequently retraction occurs in a certain area. This is achieved by requiring the nozzle to move a set distance before it’s allowed to perform retraction again.
While a larger minimum distance increases the likelihood of stringing by preventing retractions from transpiring, it reduces the chances of a nozzle clog. This setting is especially useful if you’re printing a model with many nearby but separate locations where retractions could occur, like a hairbrush. The minimum travel distance is usually 1-2 mm, but you should adjust this value in 1-mm increments if you have issues.
Other Options
Finally, if you’re having persisting issues after adjusting the retraction distance, speed, and minimum travel, or you just want to fine-tune your settings, then there are a few other relevant settings you should check out.
The first option after enabling retraction is “Retract at Layer Change” to have the movement always happen when a layer is completed, although this is mostly recommended if the retraction distance is low.
If you’re printing a flexible material, like TPE or TPU, opting for “Retraction Extra Prime Amount” can be useful. This is because it tries to compensate for material that may be lost when the filament is pushed back, and flexible materials can take a bit longer to retract compared to other filaments.
Because the filament can be worn down by the feeder wheel when it’s being pulled back and forth, defining a “Maximum Retraction Count” limits the number of times that retraction can take place on a length of material, which is set under “Minimum Extrusion Distance Window”.
Other retraction-related settings include Combing Mode, “Avoid Printed Parts When Traveling” and “Avoid Supports When Traveling”, which are pretty self-explanatory, although their disadvantages include more potential oozing as well as longer travel moves.


