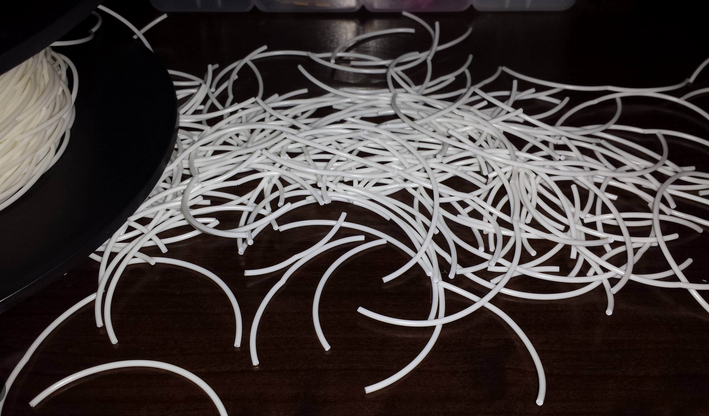
Snapped Filament
Cause
Filament snapping during 3D printing can be caused by several factors, with the primary one being the use of old or low-quality filament. While most filaments like PLA and ABS have good durability, improper storage conditions, such as exposure to direct sunlight, can make them brittle and prone to snapping. In such cases, adjusting printer settings won’t resolve the issue.
Another contributing factor is the filament diameter, which can vary between manufacturers and even different batches from the same manufacturer. If the idler tensioner is set too tight, it can exert excessive pressure on the filament, leading to snapping, even if the filament is still usable.
To prevent filament snapping, it’s important to store filaments properly in a dry and cool environment, away from direct sunlight. Additionally, adjusting the idler tensioner to the appropriate level can help prevent excessive pressure on the filament. Regularly checking the filament diameter and using high-quality filament can also minimize the risk of snapping during printing.
Troubleshooting:
Remove the Filament
The first thing to do is to remove the filament from the printer in the usual way. Since the filament usually breaks in the tube, you need to remove the tube from the extruder and the hot end. Then heat the nozzle and pull out the filament.
Try Another Filament
If after reloading the filament it happens again, use another filament to check to see if it’s not just the old brittle filament that should be disposed of.
Loosen the Idler Tension
If the new filament snaps check that the idler tensioner isn’t too tight by loosening all the way. As the print starts, tighten until there is no slippage of the filament.
Check the Nozzle
Check the nozzle isn’t blocked and give it a good clean.
Check Flow Rate and Temperature
If the problem continues check that the hot end is getting hot and to the correct temperature. Also, check that the flow rate of the filament is at 100% and not higher.
Stripped Filament
Cause
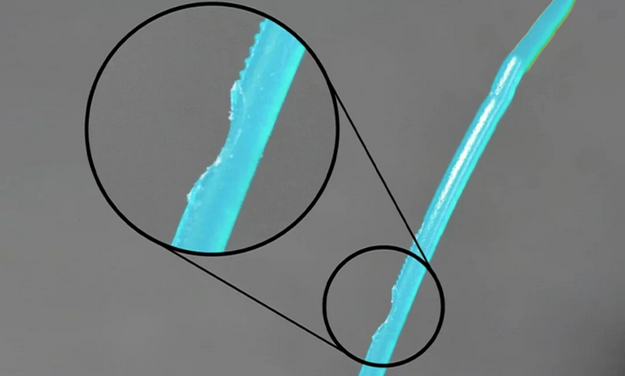
During the 3D printing process, it is possible to encounter a situation where the filament strips or slips, leading to a disruption in the extrusion of filament from the hot end. This issue can occur at any stage of the print and with various types of filament. As a consequence, the printing process is abruptly halted, and no further material is deposited to continue the print.
There are several common causes that can lead to filament blockage, a loose idler tensioner, or an incorrect hot end temperature. However, these issues are typically straightforward to address. When any of these problems occur, the knurled nut or toothed gear in the extruder is unable to effectively pull or push the filament through the printer. As the motor rotates and the gear’s teeth engage with the filament, continuous wear can eventually diminish the gripping capability of the gear, resulting in filament slipping and causing the printing process to be compromised.
Troubleshooting:
Manual extrusion
If you notice that the filament has started to slip, you can typically identify it by the noise and the presence of plastic shavings. In such cases, applying gentle pressure to the filament can help it navigate through the system. This additional pressure often aids in restoring smooth printing operation and allows the machine to continue printing without further issues.
Adjust the Idler Tension
To address the slipping filament issue, begin by loosening the idler. Then, insert the filament and tighten the idler until the slipping stops. It’s important to note that filaments can have variations in diameter, and while the idler can accommodate some differences, certain filaments may require precise adjustments for optimal grip and feeding. By making fine adjustments, you can ensure a reliable and consistent filament flow throughout the printing process.
Remove the Filament
In most instances, when experiencing filament slipping issues, it is advisable to remove and replace the filament. Begin by removing the filament from the system, then cut it below the area where slipping occurred. Afterwards, carefully feed the filament back into the system. If the filament snaps again or exhibits signs of brittleness, it is likely no longer usable. In such situations, it is recommended to discard the filament and replace it with a fresh one.
Check the Hot End Temperature
If you have recently inserted a new filament and encountered slipping issues, it is important to double-check the temperature settings. Ensure that you have set the appropriate temperature for the filament you are using. Different filaments require different temperature ranges to melt and extrude properly. Adjusting the temperature to the correct range can help alleviate filament slipping problems and ensure smooth printing.
Extrusion Stopped Mid-Print
Cause
If this happens in the middle of the print, you may want to check and make sure that the filament is clean and that there is no dust on the spool. If enough dust is attached to the filament, it can cause a clog as it builds up inside the nozzle.
Troubleshooting:
Check the filament:
Ensure that the filament spool is not tangled or tangled around the spool holder. Verify that the filament is feeding smoothly and there are no obstructions or knots in the filament path. If the filament is brittle or damaged, it may need to be replaced.
Check the nozzle:
A clogged nozzle can cause extrusion problems. Heat the nozzle to the appropriate temperature for the filament and use a small wire or needle to carefully clear any debris or filament buildup. It may be necessary to disassemble the hot end and perform a more thorough cleaning.
Check the extruder:
The extruder motor or gear may be slipping or experiencing mechanical issues. Ensure that the extruder gear is properly gripping the filament and that there is no excessive tension or blockage in the extruder assembly.
Check the filament path:
Make sure that the filament is correctly threaded through the filament sensor, extruder, and into the hot end. Ensure that there are no knots or tangles in the filament path that could impede smooth filament feeding.
Check the print settings:
Incorrect print settings, such as incorrect temperature, improper retraction settings, or insufficient flow rate, can cause extrusion problems. Review the print settings and make any necessary adjustments to ensure they are appropriate for the filament and print job.
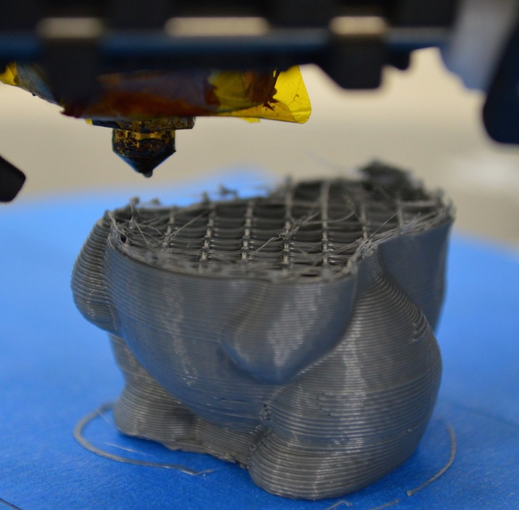
Some Layers are Missing
Cause
When gaps occur in a 3D printed model, it usually means that certain layers have been skipped either partially or entirely during the printing process. This can happen due to various reasons such as incorrect slicing settings, mechanical issues with the printer, or even software glitches. To address this issue, it is recommended to ensure proper slicer settings, check the printer’s mechanical components for any defects or obstructions, and verify that the software and firmware are up to date. Adjusting the printing speed, temperature, and layer height settings may also help to improve layer adhesion and minimize gaps in future prints.
Skipped layers in the print, also known as temporary under-extrusion, occur when the printer fails to provide enough plastic for those layers. This issue can be caused by various factors, including problems with the filament such as diameter variation, issues with the filament spool, the feeder wheel, or a clogged nozzle. It’s important to check the filament, ensure smooth feeding, and address any potential clogs to prevent skipped layers and maintain print quality.
Troubleshooting:
Mechanical Check
Regular maintenance and inspection of your 3D printer is important to ensure optimal performance. If you notice gaps in your 3D prints, it’s a good indication that it’s time to give your printer some attention. Begin by checking the rods to ensure they are properly seated in bearings or clips and haven’t shifted or moved. This is important as any misalignment or movement can affect the accuracy and quality of the prints. Taking the time to verify the positioning of the rods can help resolve issues and improve the overall performance of your 3D printer.
Rod Alignment Check
To ensure proper alignment of the rods in your 3D printer, it’s recommended to perform a manual check. Start by turning off the power or disabling the steppers, then gently move the print head along the X and Y-axis. Pay attention to any resistance or abnormal movement during this process.
If you encounter resistance or difficulties while moving the print head, it’s an indication that something is wrong. It could be due to misalignment, a slightly bent rod, or a problem with one of the bearings. By carefully inspecting the movement and identifying the source of the issue, you can take appropriate steps to address it, such as realigning the rods or replacing any faulty components.
Regularly checking the alignment of the rods and addressing any issues promptly can help maintain the accuracy and performance of your 3D printer.
Worn Bearing
When bearings in a 3D printer start to fail, they often produce noticeable noise and vibrations. You may hear an audible din and feel uneven motion in the print head. When you observe these symptoms, it’s important to take action.
To identify the region of the broken bearing, unplug the power and manually move the print head along the X and Y axes. Pay close attention to any areas where the movement feels rough, jerky, or obstructed. These are likely the regions where the bearings are damaged or worn out.
Once you have identified the problematic area, you can proceed with replacing the faulty bearing. Consult your printer’s documentation or contact the manufacturer for guidance on the specific bearing type and replacement procedure.
By addressing bearing issues promptly, you can ensure smooth and precise movement of the print head, leading to better print quality and overall performance of your 3D printer.
Check for Oil
Lubricating the joints is easy to forget, but keeping everything well-oiled is essential to the smooth running of the machine. Sewing machine oil is ideal and can be purchased from almost any haberdashery at a relatively inexpensive price. Before you go applying liberally just check that the rods are clean and free of dirt and printing debris — a quick wipe of the rods before applying a fresh coat of oil is always a good idea. When all rods look clean just dab on a little, but not too much. Then use printer control software such as Printrun to move the head through the X and Y axis to make sure that the rods are evenly covered and moving smoothly. If you add a little too much oil don’t worry just wipe some off with a lint-free cloth.
Under-Extrusion
The final issue could be under-extrusion. Check out our dedicated 3D printing troubleshooting tip for under-extrusion here.
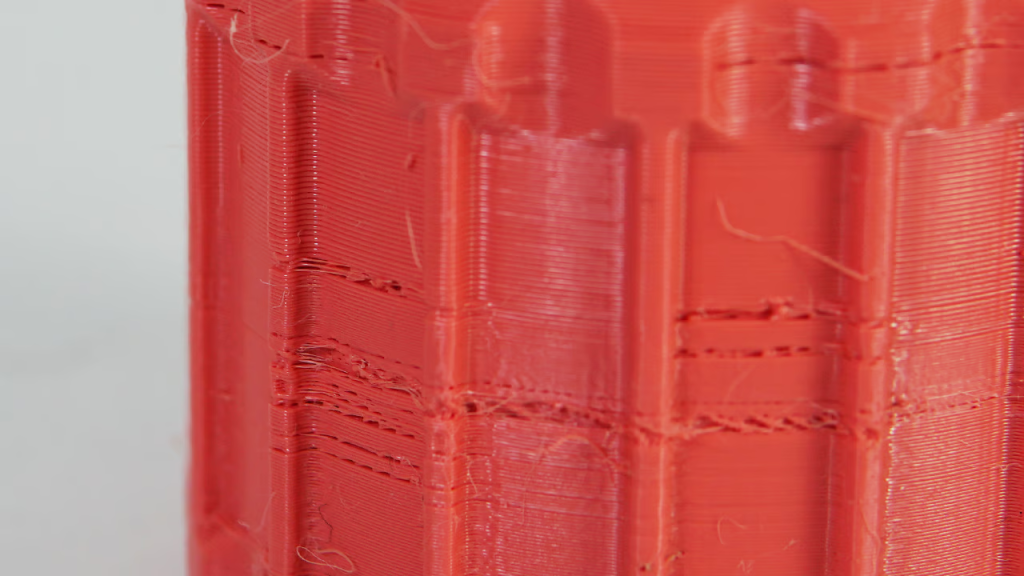
Stringing
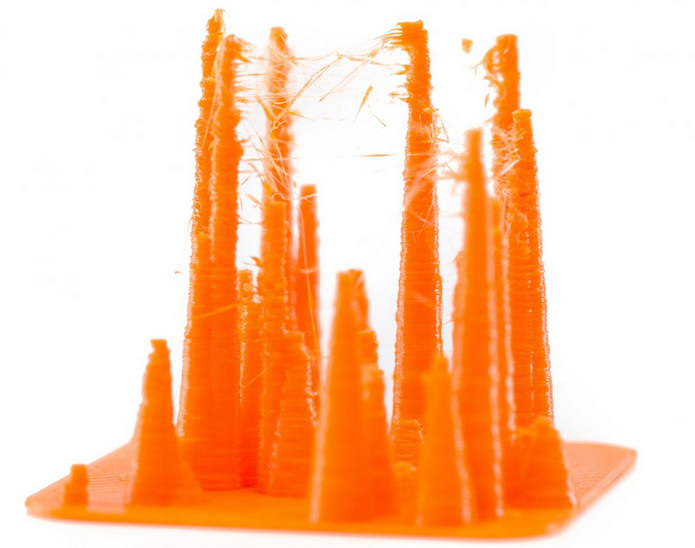
Cause
Retraction is an important factor when it comes to quality of finish and can be enabled through most slicing software. Its function is pretty simple and works by retracting the filament back into the nozzle before the head moves. The idea is that it avoids molten filament from trailing behind the head creating thin strings in its wake.
Most applications such as Cura offer a one-click activation option. This uses a set of default parameters and is perfectly adequate for the most part, but for fine-tuning there are customizable options that give greater control. Adjusting the minimum travel of the head before retraction is activated, for example.
Troubleshooting:
Minimum Travel (mm)
Reducing the minimum travel is indeed a common approach to address stringing issues in 3D printing. By lowering the minimum travel distance, the printer will perform retractions more frequently, minimizing the chances of filament oozing and resulting in stringing between print features.
To implement this fix, you can adjust the “minimum travel” or “minimum extrusion distance” setting in your slicer software. Start by reducing the value in small increments, such as 0.5mm, and observe the print results. If stringing persists, continue lowering the minimum travel value until the stringing is eliminated.
It’s important to note that while this adjustment can be effective, reducing the minimum travel distance too much may result in excessive retractions and potential print quality issues. It’s recommended to find a balance where stringing is minimized without negatively impacting other aspects of the print, such as print speed or overall quality.
Temperature
Lowering the printing temperature can help reduce stringing in 3D printing. Decrease the temperature in small increments, such as 5°C, until the desired reduction in stringing is achieved. However, be cautious not to lower the temperature excessively, as it may lead to other print issues. Consider adjusting retraction settings, print speed, and filament quality to further minimize stringing.
Retraction/Lift
Increasing the retraction length and reducing the lift can be effective in reducing stringing during 3D printing. By increasing the retraction length, the filament is pulled back further into the nozzle, preventing it from oozing and causing stringing between print moves. Reducing the lift height minimizes the distance that the nozzle moves away from the print, reducing the chance of filament stringing. Adjusting these settings in small increments and finding the optimal balance can help minimize stringing issues.


