Extrusion Calibration
Taming stringing in PETG prints requires finding the right balance in various settings, starting with extrusion. Under-extrusion results in weak and incomplete layers, while over-extrusion leads to excessive material squishing out and ruining the print. Both issues contribute to stringing, and PETG is more prone to oozing than PLA.
To check and fine-tune your machine, you can perform three useful extrusion tests. These tests not only help identify stringing but also uncover any underlying issues unrelated to PETG stringing.
It’s important to note that finding the right balance of settings is key in minimizing stringing and achieving successful PETG prints.
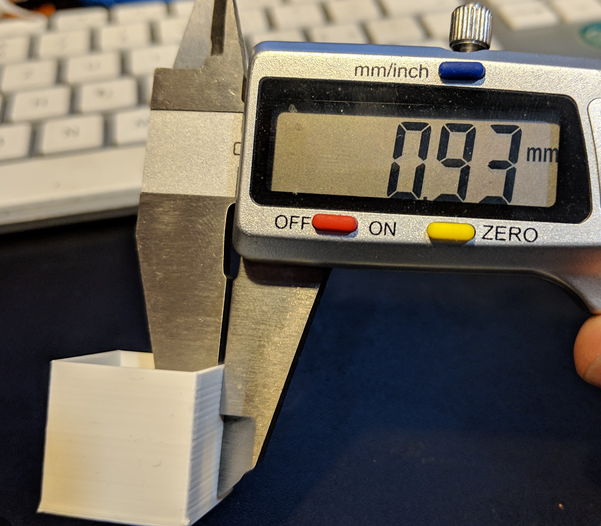
Cube Wall Test

To fine-tune your extrusion settings, print a thin-walled open cube (e.g., 0.4 mm walls with a 0.4 mm nozzle). Check for gaps (under-extrusion) or excess material (over-extrusion) on the walls. Adjust settings accordingly. Follow TeachingTech’s tutorial for guidance on generating the test file.
Manual Extrusion Test
To ensure proper extrusion settings for PETG printing, heat the hot end to the recommended temperature range (220-250 °C). Wipe the nozzle and manually extrude some filament. Watch for smooth flow without bubbling, curling, or excessive stringing. Adjust settings as needed, increasing the temperature by small increments (2-5 °C) if necessary, especially at the lower end of the range. Repeat the test to fine-tune the extrusion settings. This process will help achieve optimal extrusion and minimize issues like stringing during PETG printing.
Flow Calibration
When it comes to 3D printing, it’s remarkable how different filaments, including various PETG variants, can require slightly different flow settings. If you’ve encountered consistent stringing despite completing the previous tests, it’s possible that more significant extrusion issues are at play.
Retraction

Retraction is a process where the 3D printer retracts or pulls the filament back into the extruder during non-printing moves. It provides a brief break for the printer, preventing filament oozing or dribbling during these movements and ensuring a clean and precise print.
The speed and distance of the retraction are crucial, particularly when printing with PETG, as it tends to be stickier compared to other filaments. If the retraction settings are not properly adjusted, stringing issues can arise quickly in the print.
Retraction Speed
Many users have found that a retraction speed of approximately 35-40 mm/s is effective. However, if you’re experiencing stringing issues, it’s recommended to start at 25 mm/s for both Bowden and direct extrusion setups. Gradually increase the speed by 5 mm/s increments until you achieve optimal flow without stringing.
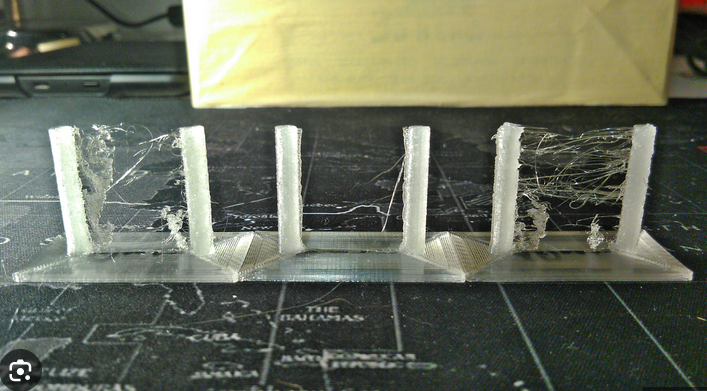
To determine the ideal retraction distance for your specific print, you can conduct a Retraction Speed Test. This involves printing a model multiple times while adjusting the retraction speed settings until you find the optimal configuration that minimizes stringing.
Retraction Distance
If adjusting retraction speed hasn’t completely resolved stringing issues, you can also tweak the retraction distance. This value varies depending on whether you have a Bowden or direct extrusion setup. Conducting a standard retraction test is a systematic approach to finding the optimal distance. However, if you’re still struggling with PETG prints, an alternative is to reduce the retraction distance to zero, particularly for Bowden setups. This unconventional approach can help minimize stringing caused by filament sticking and subsequent stretching during retraction.
Temperature

If adjusting your retraction settings doesn’t solve the stringing issue, consider lowering your printer’s temperature settings. Excessive heat can cause filament to ooze, regardless of retraction or travel settings.
Temperature adjustment can be a quick and easy fix, worth trying before delving into extrusion-related solutions. However, if lowering the temperature doesn’t immediately eliminate stringing, revert it back to normal and revisit tips 1 and 2. Different filaments may have slight variations in their chemical makeup, and a lower temperature can help reduce stringing. If the problem persists despite temperature adjustments, it may indicate a larger issue with retraction or, in more severe cases, extrusion.
Nozzle Temperature
As a starting point for PETG printing, a nozzle temperature around 240 °C is often recommended. However, it’s important to refer to the manufacturer’s documentation, especially if your PETG filament contains additives like carbon fiber or glow-in-the-dark particles.
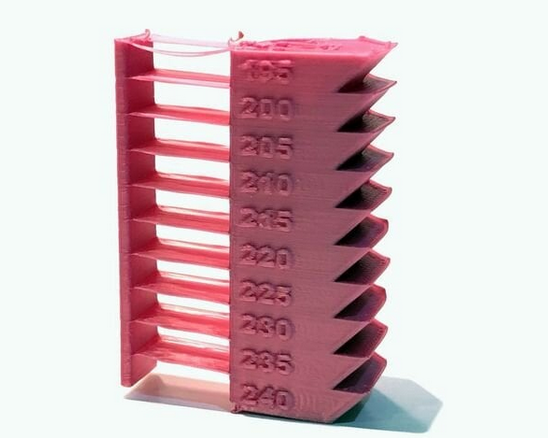
To fine-tune the nozzle temperature, you can print a temperature calibration block or a temperature tower. These test prints typically come with instructions to help you determine the ideal nozzle temperature in a single test.
While adjusting the temperature, exercise caution. Some filaments may not print well at colder temperatures, which can impact strength or surface finish. It’s beneficial to review the manufacturer’s recommendations for your specific PETG filament. Although 220 °C can serve as a starting point, increasing the temperature by 5 °C increments, it may not be hot enough for certain PETG variants.
Cooling Fan
If you’ve exhausted all the previous suggestions and stringing still persists, an unconventional approach to consider is reducing the cooling fan speed. While it may seem counter-intuitive, excessive cooling can cause PETG to become tacky and contribute to stringing.
When printing a small region, the cooling fans pass over the same spot multiple times, potentially creating a cooler environment in that area. This increased cooling can make the filament tackier and more prone to stringing. To mitigate this, set your fan speed to a maximum of 30-50% when dealing with very small regions (under 2 square inches). Conversely, for larger open parts, you may not need any cooling at all.
By adjusting the cooling fan speed appropriately based on the size and complexity of your print, you can find the right balance to minimize stringing issues with PETG filament.


